Google Ads for Easy Digital Downloads – How to setup?

Learn to set up Google Ads for Easy Digital Downloads with Google Tag Manager and GTM4WP: conversion tracking, dynamic remarketing and Enhanced Conversions, all on this page.
This page describes GTM4WP 2.1.0 and newer, the first version with Easy Digital Downloads support. Running WooCommerce instead? The same setup is covered there in three guides: conversion tracking, dynamic remarketing and Enhanced Conversions.
WARNING!
This guide doesn’t consider whether you’re utilizing a Consent Management Platform (CMP) or your preferred method for incorporating Google Consent Mode into your Google Tag Manager container. The steps to ensure the privacy of your measurement setup often rely on your chosen CMP. Reach out to your CMP’s support team for assistance.
If you use Google Consent Mode, user-provided data is subject to the ad_storage consent state. You must also accept the customer data terms in your Google Ads account before Google processes any user-provided data.
Before you start
- Create your Google Ads conversion code and have your conversion ID and label at hand
- Open the GTM4WP plugin settings page, go to the Easy Digital Downloads section and turn on Track e-commerce in the General group. This is the master switch of the whole integration
- In the same section, open the Data layer content group and turn on Order data in data layer (the discount field of the conversion tag reads it) and Customer data in data layer (Enhanced Conversions reads it)
- Import the GA4 container template as shown in Step 1 of the GA4 setup guide for Easy Digital Downloads. It creates the tags, triggers and variables used below
Conversion tracking
The container template ships a conversion tag called Google Ads – Conversion – Purchase with every field below already pointing at the right variable. What remains is to enter your own IDs and to decide which optional sections you want to keep.
Step 1: enter your conversion ID and label
Open the Google Ads – Conversion – Purchase tag created by the import.
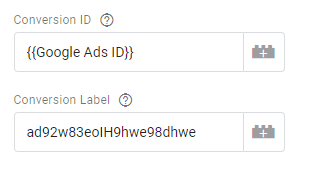
- Conversion ID: this ID is unique to your Google Ads account. Whenever you create a new conversion tracking code or a remarketing tag in the same account, the conversion ID will be the same. This is why it is worth storing in a “Constant” type variable. The template already does that: edit the Google Ads Conversion ID constant in the Variables section and replace the AW-XXXXXXXXX placeholder
- Conversion Label: this is unique to the tracking tag, so it is not stored in a variable. The template ships it as the literal text REPLACE_WITH_YOUR_DATA inside the tag. Nothing in the Variables list points at it, so it is easy to miss. Open the tag and type your own label over it
Step 2: purchase related variables
The next three fields are already filled in by the template. This is why ecommerce data in a data layer is so useful: you can read it in a unified way that does not depend on the site or the ecommerce platform.

- Conversion Value: the total revenue of the order. It is stored in the data layer under ecommerce.value, and the tag reads it through {{Ecommerce Value}}
- Transaction ID: this parameter de-duplicates conversion values in Google Ads and prevents tracking of the same order multiple times. It is also mandatory for conversion adjustments, which let Google Ads optimize bids towards your ROI goals rather than net revenue. It is stored under ecommerce.transaction_id and read through {{Ecommerce Transaction ID}}
- Currency Code: if your customers can buy in different currencies, it is important to let Google Ads know what currency to use when calculating the conversion value. It is stored under ecommerce.currency and read through {{Ecommerce Currency}}
Step 3: provide product-level sales data (optional)
This step is not mandatory for conversion tracking to work, but it gives you additional reports in Google Ads. With conversion reporting with cart data you can see which product ads drove sales to which downloads on your site.
The template turns the “Provide product-level sales data” box on and fills in the fields below. Three of them need your own values.
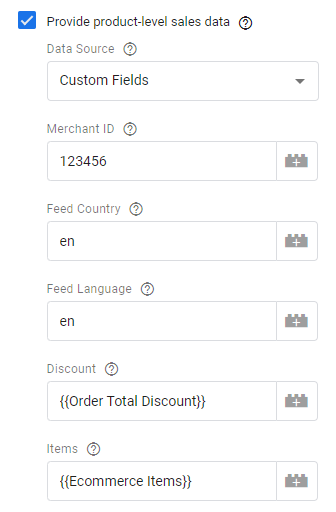
- Data Source: “Custom Fields”. GTM4WP does not write the merchant ID, feed country and feed language into the data layer, so the “Data Layer” option would find nothing to read
- Merchant ID: your Google Merchant Center ID. Open your GMC account and look at the top of the page, in the account selector dropdown, next to the account name. Enter it in the Google Merchant Center ID constant
- Feed Country: the country associated with the feed where your items are uploaded, as a territory code such as US. Enter it in the Google Merchant Center Feed Country constant
- Feed Language: the language associated with the feed, as an ISO 639-1 code such as en. Enter it in the Google Merchant Center Feed Language constant
- Discount: the total amount of discount in the order, read through {{Order Data – Total Discount}} from orderData.totals.total_discount. If you want a value even when the order carries no discount, open that variable and set its default value to 0
- Items: the download IDs, prices and quantities in the order. The format is exactly the same as the product data in GA4 ecommerce, so the tag reads {{Ecommerce Items}}
Step 4: provide new customer data (optional)
This step is optional as well, and it gives you an advantage in your Shopping and Performance Max campaigns: you can bid differently for people who have never bought from you. In your campaign settings you can attach a separate, usually higher, value to new customers.

The template turns the checkbox on and selects “Data Layer” as the data source. Nothing else is needed. GTM4WP writes the new_customer parameter at the top level of the purchase event, which is where the Data Layer option looks for it.
A buyer counts as new when the order has no Easy Digital Downloads customer record, or when that record holds no earlier purchase.
Step 5: turn off the shipping data section
WARNING!
The template turns the “Provide shipping data” section on, because it is shared with WooCommerce stores. Easy Digital Downloads has no shipping, so turn this checkbox off. Left on, the section sends empty shipping fields and the literal text REPLACE_WITH_YOUR_DATA as the estimated delivery date, which Google Ads accepts as real data.
Step 6: enable Restricted Data Processing if necessary
Restricted Data Processing changes how Google Ads processes data for users who opt out under the U.S. states’ privacy laws. Google’s guidance covers California, Virginia, Colorado, Connecticut and Florida, so this is no longer a California-only question.
The template leaves this setting off. There is no single correct way to turn it on, because the value depends on the consent banner on your site and the choices you offer your visitors. Each consent platform stores consent states in its own 1st party cookies, so no one solution works with all of them.
Step 7: the purchase trigger
The container template creates a trigger named Event – Purchase and attaches it to the conversion tag, so there is nothing to do here.
If you build the trigger yourself, use the type Custom Event with the event name purchase. Check your container for an existing one before creating a duplicate.

Dynamic remarketing
Dynamic remarketing shows your past visitors ads built from the downloads they viewed, added to the cart or bought, without you writing a separate ad for each one. Google Ads reads which downloads a visitor interacted with from the item data GTM4WP puts into the data layer, and matches them against your product feed.
Two ways to send the data
GTM4WP already sends GA4 ecommerce events, and those events carry the item data that dynamic remarketing needs. If your Google Analytics 4 property is linked to your Google Ads account, Google can pass those attributes across for you, and you do not need the remarketing tag described in Step 2 below.
Google describes this on the Tag Platform dynamic remarketing page and in Analytics Help: web and app display dynamic remarketing is available in Google Analytics, and it transfers dynamic attributes such as product IDs and price values directly to Google Ads.
The Analytics route needs three things:
- ecommerce tracking set up as described in the GA4 setup guide for Easy Digital Downloads, so that your events carry the item data
- Google signals or user-provided data collection turned on in your GA4 property
- the property linked to your Google Ads account, with Enable Personalized Advertising selected in the link
Allow up to two days after linking for the audience lists to appear in Google Ads.
The other route is a tag of your own in Google Tag Manager that sends the data to Google Ads directly. Pick it if you do not want the data to travel through Analytics, if the two accounts are not linked, or if you would rather leave the personalized advertising features of your GA4 property switched off. Step 1 matters either way, because it shapes the item data itself.
Step 1: set the business vertical, ID vs SKU and product ID prefix
The three options are in the Product data group of the plugin’s Easy Digital Downloads section.
Google Ads Business Vertical: select your business vertical so that Google Ads can pick the right algorithm for your campaign. The choice decides the name of the item ID parameter in your tagging and adds the matching google_business_vertical parameter to every item. There are nine verticals: Retail, Education, Flights, Hotel rental, Jobs, Local deals, Real estate, Travel and Custom. Retail is the default, and it is also the fallback if a stored value is no longer valid. For Flights and Travel the identifier is sent as destination, for every other vertical as id. GTM4WP does not send the advanced parameters of the special verticals, such as origin for Flights or location_id for Jobs.
Use SKU instead of ID: download IDs are WordPress post IDs, generated automatically, so they do not follow your own numbering. If your product feed uses SKUs instead, turn this option on, because the identifiers in your feed and in your site tagging must match for Google Ads to connect them. SKUs have to be enabled in the Easy Digital Downloads settings first. A download with no SKU falls back to its ID.
Product ID prefix: some feed generators put a fixed text in front of the IDs they write into the feed. Enter that text here so that the IDs in your tags match. The prefix goes on the Google Ads identifier (id or destination) only, never on the GA4 item_id.
Next to proper tagging, dynamic remarketing also requires a product feed, which GTM4WP does not create. For the Retail vertical the feed has to be uploaded to Google Merchant Center. For other verticals it can be uploaded directly to Google Ads.
Step 2: set up your Google Ads dynamic remarketing tag
The container template does not contain this tag, so create a new Google Ads remarketing tag. Set a name, for example “Google Ads – Remarketing – Ecommerce Events”.

- Select the {{Google Ads Conversion ID}} constant as the Conversion ID
- Turn on the Send dynamic remarketing event data option
- Set the {{Event}} variable in the Event Name field
- Set the {{Ecommerce Value}} variable in the Event Value field
- Set the {{Ecommerce Items}} variable in the Event Items field
- Scroll down to the Triggering section and add the Event – Ecommerce Events trigger
- Add every blocking trigger that prevents data collection when the visitor has not consented to it
Save the tag.
Enhanced Conversions
Measuring conversions with cookies alone has become less reliable. Browser tracking protections, shorter cookie lifetimes and consent requirements all mean that some of your conversions can no longer be connected to the ad click that produced them. Enhanced Conversions recovers part of them: the conversion tag also sends identifiers of the buyer, such as the email address, and Google matches them against signed-in Google accounts.
The email address, phone number and names are hashed with SHA256 on your server, so the plain values never reach the browser. A hash cannot be turned back into the original value, so Google learns nothing about a buyer it cannot already match. You may still need the buyer’s consent before sending them.
Step 1: check customer data in the data layer
GTM4WP builds the identifiers from the order and adds them to the purchase event as a ready-made user_data object, but only while Customer data in data layer is on (see Before you start). The label is easy to misread: the same option also adds the details of logged-in customers to every page. The user_data object is built from the order rather than from a customer account, so guest purchases are covered too. The phone number comes from the Easy Digital Downloads Phone field or from a checkout-field extension.
With the option off there is no user_data in the data layer, and your conversion sends no user-provided data. Google Ads does not report this as an error. Open Google Tag Manager preview mode on a purchase confirmation page and check that user_data is present on the purchase event.
Step 2: check the User-Provided Data variable
The container template ships this variable already configured, so there is nothing to fill in. Open it and confirm two things: the mode is Code, and the data source is {{User Data (Enhanced Conversions)}}.
Code mode passes the object to Google as it is, with no row by row mapping. GTM4WP writes user_data in the shape Google documents: sha256_email_address, sha256_phone_number, and an address block containing sha256_first_name, sha256_last_name, street, city, region, postal_code and country. The address components travel as plain text, which is what Google expects for those fields. Any field that is empty in the order is omitted rather than sent as a blank value.
If you would rather decide field by field what leaves your site, switch the variable to Manual Configuration and select the imported “Order Data -” variables row by row. That route reads the orderData object, so it needs Order data in data layer as well. The email address is the one row you cannot leave empty.

Step 3: send the data with your conversion
The template contains a tag named Google Ads – User-provided Data – Purchase. It sends the user-provided data on its own and needs nothing from you beyond your conversion ID, which it reads from the “Google Ads Conversion ID” constant. It fires on the “Event – Purchase” trigger, the same trigger as the conversion tag.
Do not connect the conversion and user-provided data tags with tag sequencing. Both belong on the purchase trigger. If the user-provided data tag ran as a setup tag, anything that stopped it, including a consent tool blocking it, could stop the conversion from firing as well.
Check your work before you publish
Open Google Tag Manager preview mode and place a test order. On the purchase event, check that the conversion tag and the user-provided data tag fired, that user_data is present, and that no field still contains REPLACE_WITH_YOUR_DATA, AW-XXXXXXXXX or ADD_YOUR_GMC_ID. Browse a download page as well and check that your remarketing tag fires on view_item. After publishing, the cart data diagnostics in Google Ads is the place to confirm that product-level data arrives as expected.